
| Version 6 (modified by , 7 years ago) ( diff ) |
|---|
Running OpenAirInterface in docker containers
Description
This tutorial will guide you through running the OpenAirInterface (OAI) platform (www.openairinterface.org) in Orbit by using docker containers.
Hardware Used
- Grid Nodes with USRP B210
- Baseline image docker_oai.ndz
Setup
- To get started, make a reservation on the Orbit scheduler for using the Grid nodes. The tutorial assumes that the nodes hosting the dockers have a USRP B210 attached on them.
- Once the reservation starts, log in to the grid console and load the image on the testbed node with the installed USRP B210. Before doing so, verify the state of all the nodes in the testbed:
nimakris@console.grid:~$ omf tell -a offh -t all
nimakris@console.grid:~$ omf stat -t all
If the nodes report in POWEROFF state, then go ahead and load the image on a USRP B210 node with the following command:
nimakris@console.grid:~$ omf load -t node13-7 -i docker_oai.ndz
- After the image is loaded on the node, you need to turn it on, with the following command:
nimakris@console.grid:~$ omf tell -a on -t node13-7
- Once the node is up and running (you can test this by sending a ping command) log on the node as root
nimakris@console.grid:~$ ssh root@node13-7
Running the docker containers
Scripts are installed on the node in order to facilitate running the containers. Follow the following steps:
- Pull the images for the containers locally with:
root@node13-7:~# cd docker-containers/
root@node13-7:~/docker-containers# ./docker_init.sh
The command will take some time as it retrieves all the containers from a registry over the Internet. Its output should be similar to the following:
root@node13-7:~/docker-containers# ./docker_init.sh
Images destination:      /usr/share/uhd/images
Downloading images from: http://files.ettus.com/binaries/images/uhd-images_003.009.002-release.zip
Downloading images to:   /tmp/tmp9M_J2T/uhd-images_003.009.002-release.zip
26296 kB / 26296 kB (100%)

Images successfully installed to: /usr/share/uhd/images
linux; GNU C++ version 5.3.1 20151219; Boost_105800; UHD_003.009.002-0-unknown

-- Loading firmware image: /usr/share/uhd/images/usrp_b200_fw.hex...
--------------------------------------------------
-- UHD Device 0
--------------------------------------------------
Device Address:
    type: b200
    name: MyB210
    serial: 30AD29B
    product: B210

**Rest of docker output is omitted**

39c677681ea4a6e09a293a428b4e2fc84baf4906158edfac9f2000e02ad7ea15
1400ca2f0bcbdaf2b91c53a866673dd018ae30fb11da20fed1692bedc2ea5d20
7f80be2cbdc4f23a65a969740cd7cdea22a69d180ef41c1423e9ccd13bfb7db3
316ac2399384baa5fbf94163be2e0a8f35bb30d75cf356183b67701f72d48802
7f1b5f0dfb2e2a16ab1516f7acd0b5b0916819680d8ad629181bd543cb827616
be9d5e88c14f48ff9d2332c5ce88f14ae7814e7fb9ffa1492ed276628dbc4ff9
289436b174e36140fac36c0d01320710fab570ab89fec2c6a088f791d7d9b758
hss
mme_spgw
mec
oai_ran
wifidu
mec_service
oai_enb
Once the process has ended the images are located locally on the machine. Verify that the following command shows images located locally:
root@node13-7:~/docker-containers# docker images
REPOSITORY                                     TAG                 IMAGE ID            CREATED             SIZE
repo.nitlab.inf.uth.gr:5000/oai/oai_ran        version20           49dbf718a92c        4 hours ago         5.96GB
repo.nitlab.inf.uth.gr:5000/oai/mec_app        version20           12bc647ec4aa        3 days ago          204MB
repo.nitlab.inf.uth.gr:5000/oai/mec_agent      version20           17959ec65057        3 days ago          965MB
repo.nitlab.inf.uth.gr:5000/oai/oai_ran_du     version20           54ca1d78946d        3 days ago          3.79GB
repo.nitlab.inf.uth.gr:5000/oai/oai_mme_spgw   version20           71c00e425751        3 days ago          1.67GB
repo.nitlab.inf.uth.gr:5000/oai/oai_hss        version20           17a308a08eca        3 days ago          1.72GB
repo.nitlab.inf.uth.gr:5000/oai/wifidu         version20           9d33b7d67d2d        3 days ago          549MB
Also, the following command should show that no docker is currently running
root@node13-7:~/docker-containers# docker ps
CONTAINER ID        IMAGE               COMMAND             CREATED             STATUS              PORTS               NAMES
- Now you are ready to launch the services, in order to deploy 3 dockers for running the HSS, MME/S-PGW and the eNodeB. In order to do so, run the following:
root@node13-7:~/docker-containers# ./autostart_dockers -p 00101
PLMNID is 00101
Starting all docker containers..
HSS Docker started successfully..
MME & S-/P-GW Docker started successfully..
Turning on the USRP device
Turing on USRP device
Will start the OAI eNB Container
OAI eNB docker started successfully..
Starting the API on the HSS contaner..
Generating configuration on the HSS container.
Starting HSS on the container
Waiting for 10 seconds for the HSS to start correctly..
Starting the API on the MME & S-/P-GW contaner..
Generating configuration on the EPC container.
Starting EPC on the container
Starting the API on the OAI eNB..
Generating configuration on the OAI eNB container.
Starting OAI RAN on the container
The script launches all the containers and dynamically sets up their configuration files. This example is using as a PLMNID the 00101, but you can pass as an argument different PLMNIDs to match your UEs. 00101 is the PLMN used by the Orbit UEs. If you want to change the PLMNID, open the autostart_dockers file and add the respective information for your OP code.
- Verify that all the dockers are running correctly by using the following command:
root@node13-7:~/docker-containers# docker ps
CONTAINER ID        IMAGE                                                    COMMAND             CREATED             STATUS              PORTS               NAMES
be9d5e88c14f        repo.nitlab.inf.uth.gr:5000/oai/oai_mme_spgw:version20   "bash"              6 minutes ago       Up 3 minutes                            mme_spgw
7f80be2cbdc4        repo.nitlab.inf.uth.gr:5000/oai/oai_ran:version20        "bash"              6 minutes ago       Up 3 minutes                            oai_enb
39c677681ea4        repo.nitlab.inf.uth.gr:5000/oai/oai_hss:version20        "bash"              6 minutes ago       Up 3 minutes                            hss
You can also attach to the eNB docker to verify that OAI is running correctly the eNodeB with the following command:
root@node13-7:~/docker-containers# docker exec -ti oai_enb tail -f /tmp/oai.log
[PHY]   thread rxtx created id=79
[HW]   [SCHED][eNB] eNB_thread_prach started on CPU 0, sched_policy = SCHED_FIFO , priority = 99, CPU Affinity= CPU_0 CPU_1 CPU_2 CPU_3 CPU_4 CPU_5 CPU_6 CPU_7
ALL RUs ready - ALL eNBs ready
[HW]   [SCHED][eNB] eNB_thread_prach_br started on CPU 0, sched_policy = SCHED_FIFO , priority = 99, CPU Affinity= CPU_0 CPU_1 CPU_2 CPU_3 CPU_4 CPU_5 CPU_6 CPU_7
[PHY]   ru_thread_prach() RACH waiting for RU to be configured
[PHY]   ru_thread_prach() RU configured - RACH processing thread running
Sending sync to all threads
TYPE <CTRL-C> TO TERMINATE
Entering ITTI signals handler
got sync (ru_thread)
- In order to attach a UE to the network, follow the instructions for the LTE UEs of Orbit, mentioned here: Available Devices, Connecting an LTE UE to the network. All the Orbit UEs are already registered with the HSS, so they should require no further configuration. The default APN that you should use with this network is oai.ipv4. You can use the lte-ue.ndz image for loading it on a node equipped with an LTE dongle. The image has pre-installed all the required drivers for attaching the LTE dongle on the node, and only requires from you to send the commands for attaching it to the network.
- Once your experiment ends, you can bring down safely all the dockers with:
root@node13-7:~/docker-containers# ./autostart_dockers -s

OAI eNB docker stopped
MME & S-/P-GW docker stopped
HSS docker stopped
- You can also delete all the local images in order to save space before saving the node image with the following command:
root@node13-7:~/docker-containers# ./destroy_all_dockers.sh
Running the MEC over FH experiment in dockers
You can also run the experiment over dockers for the setup that is presented in the following papers: On Minimizing Service Access Latency: Employing MEC on the Fronthaul of Heterogeneous 5G Architectures, Employing MEC in the Cloud-RAN: an Experimental Analysis, Cloud-based convergence of heterogeneous RANs in 5G disaggregated architectures
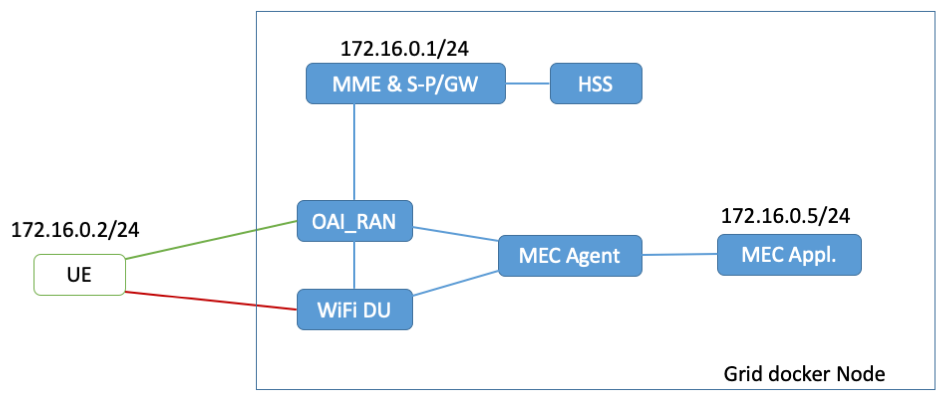
The configuration is integrating WiFi at the PDCP layer of OAI, and also a MEC agent that allows traffic from the same UE attached to the LTE and WiFi networks to reach a service deployed on the MEC agent. MEC traffic goes up to the PDCP layer of the stack.
The setup will deploy dockers over the node using two different networks, based on the following architecture.

NOTE: Verify the MAC address for the WiFi device that you will use at the UE part of the network, and place it in the autostart_dockers script at the CLIENT_MAC variable.
- Start the containers with the following command:
root@node13-7:~/docker-containers# ./autostart_dockers -p 00101 --mec
PLMNID is 00101
Running with MEC enabled
Starting all docker containers..
HSS Docker started successfully..
MME & S-/P-GW Docker started successfully..
MEC Application Docker started successfully..
MEC Agent Docker started successfully..
Attaching WiFi device on the docker
WiFi DU Docker started successfully..
Turning on the USRP device
Turing on USRP device
Will start the OAI RAN Container
OAI RAN Docker started successfully..
Starting the API on the HSS contaner..
Generating configuration on the HSS container.
Starting HSS on the container
Waiting for 10 seconds for the HSS to start correctly..
Starting the API on the MME & S-/P-GW contaner..
Generating configuration on the EPC container.
Starting EPC on the container
Collecting the required information from applications..
Starting MEC Agent software
/root/mec_daemon.rb start -- -m 172.18.0.4 -p 50000 -d 02:42:ac:10:00:05
Starting hostapd and DU agent on the WiFi DU
/root/wifidu_daemon.rb start -- -a 172.18.0.5 -m 172.18.0.4 -p 50000 -d 7c:c3:a1:a8:09:6b
Starting the API on the OAI RAN (CU&DU)..
Generating configuration on the OAI RAN container.
Starting OAI RAN on the container
- You can verify that OAI is running in the docker by attaching to it and dumping the log file:
root@node13-7:~# docker exec -ti oai_ran tail -f /tmp/oai-du.log

[HW][I][SCHED][eNB] RX thread 9 started on CPU 1 TID 98, sched_policy = SCHED_FIFO, priority = 98, CPU Affinity =  CPU_0 CPU_1 CPU_2 CPU_3 CPU_4 CPU_5 CPU_6 CPU_7
Creating main eNB_thread
[HW][I][SCHED][eNB] Started eNB main thread on CPU 4 TID 99 , sched_policy = SCHED_FIFO, priority = 99, CPU Affinity =  CPU_0  CPU_1  CPU_2  CPU_3  CPU_4  CPU_5  CPU_6  CPU_7
eNB_thread: mlockall in ...
eNB_thread: mlockall out ...
waiting for sync (eNB_thread)
Sending sync to all threads
TYPE <CTRL-C> TO TERMINATE
Entering ITTI signals handler
got sync (eNB_thread)
PROTO_AGENT Creating a new link client socket connecting to 172.18.0.6:2210
PROTO_AGENT Creating a new link client socket connecting to 172.18.0.5:2210
PROTO_AGENT Creating a new link client socket connecting to 172.18.0.4:50000
If you see an output similar to the above, then the dockers are running correctly.
NOTE: If you receive a TX_THREAD busy error, stop and restart all dockers. As this setup is based on an older code of OAI, it consumes significantly more resources. Try to run it on a powerful node of the testbed (e.g. Intel Core Gen8), as it is more stable.
- Verify that all the dockers are running correctly with the "docker ps" command:
root@node13-7:~/docker-containers# docker ps
CONTAINER ID        IMAGE                                                    COMMAND             CREATED              STATUS              PORTS               NAMES
885d5f9e656a        repo.nitlab.inf.uth.gr:5000/oai/mec_app:version20        "bash"              About a minute ago   Up About a minute                       mec_service
4fdc44c0f92b        repo.nitlab.inf.uth.gr:5000/oai/oai_mme_spgw:version20   "bash"              About a minute ago   Up About a minute                       mme_spgw
76188a873c38        repo.nitlab.inf.uth.gr:5000/oai/wifidu:version20         "bash"              About a minute ago   Up About a minute                       wifidu
a9474cbf9bec        repo.nitlab.inf.uth.gr:5000/oai/mec_agent:version20      "bash"              About a minute ago   Up About a minute                       mec
9fb7a1af726a        repo.nitlab.inf.uth.gr:5000/oai/oai_ran_du:version20     "bash"              About a minute ago   Up About a minute                       oai_ran
f78068dcf326        repo.nitlab.inf.uth.gr:5000/oai/oai_hss:version20        "bash"              About a minute ago   Up About a minute                       hss
- Now, you can go ahead and attach a multi-homed UE to the node. You can attach a multihomed UE as usually to the LTE network. For the WiFi part, connect to the "FLEXSPLIT" network and setup the address to be the same as the LTE UE.
- You can try to ping either services after the MME (172.16.0.1) or services placed in the mec_service docker at the 172.16.0.5 address.
- Once your experiment ends, you can bring down safely all the dockers with:
root@node13-7:~/docker-containers# ./autostart_dockers -s

OAI eNB docker stopped
MME & S-/P-GW docker stopped
HSS docker stopped
- You can also delete all the local images in order to save space before saving the node image with the following command:
root@node13-7:~/docker-containers# ./destroy_all_dockers.sh
Attachments (1)
- grid_mec.png (52.2 KB ) - added by 7 years ago.
Download all attachments as: .zip