
OMF Demonstration for GEC4 (March 09)
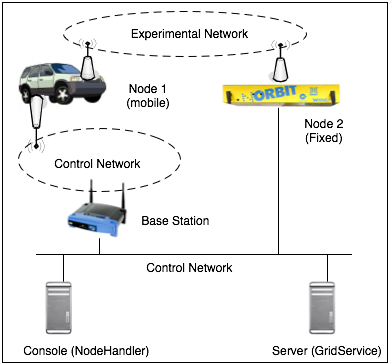
- Updated overview illustration of the demo:

Fig 1. Demo Setting
Step 1: Install new Grid Service.
- Update the current Grid Services for the outdoor testbed with the GS package attached below.
- All the services configuration should be the same as before for: cmc, frisbee, inventory, oml2Server, pxe.
- Install (or update if already installed) the OMLv2 server on the machine that will run the 'oml2Server' gridservice. Use the OMLv2 Server package below.
- We now have a new service called 'result' (which allows user to access experiment measurement databases without login to the server hosting that database).
- The 'result' service needs to be activated on the same server that runs the 'oml2Server' service. Indeed, it will look for the databases that OMLv2 server has created on the disk of that machine.
- The 'result' service needs 'sqlite3' and 'libsqlite3-ruby1.8' to be installed on that same server as well ('apt-get install sqlite3 libsqlite3-ruby1.8').
- To configure the 'result' service: configuration file should be '/etc/gridservices2/available/result.yaml.winlab'. This file does not exist in the package at the moment, but there is a 'result.yaml.nicta' which you could use as a template. In fact, you should pretty much be able to use it as is.
- To active the 'result' service: as usual, create symlink '/etc/gridservices2/enabled/result.yaml' pointing to '/etc/gridservices2/available/result.yaml.winlab'
- To test the 'result' service: assuming the server name is 'oml' then use 'wget -O - http://oml:5022/result' to get a list of available commands, then call one of these commands with a valid experiment ID.
Step 2: Install new Node Handler.
- Update the current Node Handler for the outdoor console with the NH package attached below
- To configure NH: in '/etc/nodehandler4' create a symlink named 'nodehandler.yaml' to nodehandler.yaml.winlab'
- If necessary, modify nodehandler.yaml.winlab as you would do for other consoles at winlab.
- Nothing special (compared to a normal NH upgrade on other winlab testbed) should be done here. By default with 'nodehandler.yaml.winlab' config file, the NH should use Multicast to communicate with the nodes, which is exactly what we want for this demo.
Step 3: Install new software on each Node
- First load the latest baseline image on a node. You should use a fixed node here to make things easier. We will install all the required software on that fixed node, then we will create an new 'demo' disk image from that node, and use it to install on other nodes (fixed and mobile)
- Update the current Node Agent for the node with the NA package attached below.
- IMPORTANT: install the sudo package on the node - and add the node's name on /etc/hosts
- Nothing special (compared to a normal NA upgrade on other winlab testbed) should be done here. By default with 'nodeagent.yaml.winlab' config file, the NA should use Multicast to communicate with the NH, which is exactly what we want for this demo.
- Update the current OTGv2 applications with the OTGv2 package below.
- Install the Node Handler package on each node. The /etc/nodehandler4/nodehandler.yaml.winlab should be the correct config file (symlink it to '/etc/nodehandler4/nodehandler.yaml'
- Install the new Libsigar library from the package below.
- Install the new OMLv2 Client library from the package below.
- No configurations are required for these software (OTGv2, Libsigar, OMLv2 client).
Step 4: GPS measurement collection and visualization
- Install the latest version of the oml2client debian package on the mobile node
- Start the OML2 server on a port different than the one the grid service is usually using. For example I'm using the following command
oml2-server -l 15000
- On the node with the GPS device. First you need to do twice:
stty -F /dev/ttyUSB0 ispeed 4800
- After, you need to start the GPS software with the following command:
gps_oml2 --oml-exp-id /tmp/<unique name> --oml-id /tmp/<unique name> --oml-server tcp:<server address>:15000 /dev/ttyUSB0
- Finally you need to start on the server the script "gps_client.rb" with the following command:
ruby gps_client.rb <unique name> localhost
- You can now visualise the position and the movement of the car at http://ireel.npc.nicta.com.au/gpsorbit
Step X: Testing
- Copy the attached experiment file 'vehicle-experiment-v1.rb' to the console of the outdoor testbed.
- There are a lot of comments in this file, so it should be easy to customize it for an initial scenario with only 2 fixed nodes on the outdoor testbed.
- You will notice NH different outputs than usually seen on the previous NH running on indoor testbeds.
- After a successful test on fixed nodes, we can modify the script again to now run it with 1 mobile vehicle node.
Last modified
17 years ago
Last modified on Mar 19, 2009, 11:57:10 PM
Attachments (13)
- vehicle-experiment-v1.rb (1.9 KB ) - added by 17 years ago.
- gridservices2_2.2.0_all.deb (985.8 KB ) - added by 17 years ago.
- nodeagent4_4.4.0_all.deb (781.3 KB ) - added by 17 years ago.
- libsigar_1-1_i386.deb (314.9 KB ) - added by 17 years ago.
- oml2server_1-1_i386.deb (129.3 KB ) - added by 17 years ago.
- otg2_1-1_i386.deb (173.9 KB ) - added by 17 years ago.
- demo-settting-v2.png (47.1 KB ) - added by 17 years ago.
-
nodehandler4_4.4.0_all.deb
(1.1 MB
) - added by 17 years ago.
New version (Friday 13 March) - Fixing bug found by Mesut
-
nodeagent4_4.4.0_all.2.deb
(781.3 KB
) - added by 17 years ago.
FRIDAY 20 MARCH - Version which have the NA sending 3 times "END_EXPERIMENT"
-
oml2client_1-3_i386.deb
(144.1 KB
) - added by 17 years ago.
New Version Sent by Guillaume on March 24, 1:50AM
-
Poster-Demo-GEC4.zip
(5.0 MB
) - added by 17 years ago.
Poster Describing Demo Scenario (zipped EPS version)
-
Poster_OMF-GEC4.ppt
(4.2 MB
) - added by 17 years ago.
Poster on OMF (updated from previous NICTA poster - PPT source)
-
NICTA_LOGO.jpg
(22.2 KB
) - added by 17 years ago.
NICTA Logo to include in Posters
Note:
See TracWiki
for help on using the wiki.