
| Version 5 (modified by , 13 years ago) ( diff ) |
|---|
LV-67J Specifics
Bios Flashing Instructions
Make A USB Flash disk.
Building a flash drive to update bios on LV motherboards
Table of Contents
How to build the USB boot stick:
You will need:
- Bios Image (Board Specfic)
- Rufus Utility, downloadable here
NOTE: The tools and bios files for the LV-67X line are located on the archive(Windows share: \\archive2\pub\Archive\PC\Bios)
To Create the USB Flash Disk:
- Run the Rufus utility
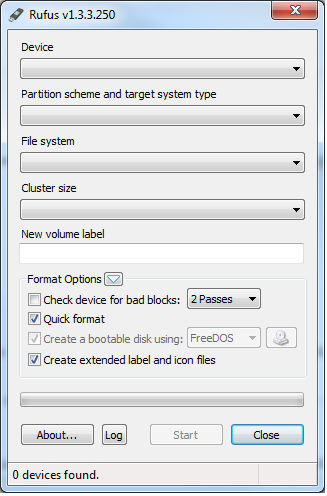
- Choose options to make the usbflash disk freedos bootable
- Once complete remount the flash disk and copy the folders containing the update utilities for the motherboards you need to update

This disk should now be capable of Flashing your bios.
In the LV-67B bios (and I suspect others in the LV line), the flash disk can be put into 1 of 3 modes USB-FDD, USB-HDD, AUTO. The Auto mode guesses either FDD or HDD. When in the FDD mode the bios treats the flash disk like a floppy. This mode DOES NOT work with the tools for building a USB flash Drive. The HDD mode does work. To use this mode however, you need to specify Hard disk as the booting device and the modify the Hard drive boot order to put your USB Flash disk first.
======= Bios Setup =======
- Go to tab Exit
- Load Default settings
- Then enable the following options
- Main
- Boot Features
- enable quickboot
- disable console redirection
- Boot Features
- Advanced
- network config
- disable advanced lan oprom
- network config
- Others
- hardware monitor
- warning temp = 80c
- enable cpu fan temp control
- temp = 40c
- threshold = 5c
- hardware monitor
- Boot (use + and - to move items, arrow keys to navigate. shift+1 toggles enabled state)
- usb hdd
- usb cd
- HDD0
- internal shell
- move all others below these, and disable with shift+1
NOTE: Let the BIOS reboot till the node boots up properly
======= Troubleshooting =======
- Step 1 is to reset bios to default settings and reset options as above.
- If this fails, remove power from the motherboard, move the cmos jumper to position 2, wait at least 30 seconds, and then move it back. Then reset bios options as above.
- Jumper: JRTC
- Type: Onboard 3-pin jumper
JRTC Mode 1-2 Clear CMOS 2-3 Normal Operation Default setting: 2-3

- If bios is corrupted, reflash according to directions at http://www.commell.com.tw/Support/Product%20Technical%20Support/LV-67K.htm
- When flashing bios, be sure to use -savemac option.
- If mac is lost, MACtool below can be used.
urls used
http://www.asrock.com/support/Download/MacTool.asp
http://www.paoloiannelli.com/tag/flashdisable/
STUB
For use as console: Making Switch:
- Take switch from bin
- Cut 4 wires, 24awg, 2 black, 1 blue, 1 red
- Strip ends of wires, short on 1 side, about 1cm on other
- crimp short molex pins onto ends
- solder other ends to switch.
- Blue to terminal by mark (led positive)
- Black opposite it.
- Other two terminals get red and black, orientation doesn't matter. (switch)
- cut heat shrink to length, slide over wires down to terminal
- shrink
- twist wire pairs to keep separate
- plug pins into molex terminals.
- red/black to 2 pin
- blue/black to ends of 3 pin
BIOS Settings (bios version 1.1J):
- Main
- Boot Features (get right name)
- Quick Boot (ON)
- Console Redirection (ON)
- Terminal Type (ANSI)
- UEFI Boot (OFF)
- Boot Features (get right name)
- Advanced
- Processor Configuration
- Intel ® HT Technology (ON)
- Intel ® Virtualization Technology (ON) (Default)
- System Agent Configuration
- Intel VT for directed IO (ON)
- Network Configuration
- LAN OPROM Selection (ON)
- Wake on PCH LAN (OFF)
- AMT Configuration (Maybe needed, built in serial over lan?)
- Disable
- ME configuration
- Disable
- Processor Configuration
- Other
- SIO config
- Paraller port (disabled)
- Hardware Monitor
- CPU warning temp (90C)
- Fan control (by temperature)
- Fan control threshold (40c)
- SIO config
- Boot Order
- Usb Hdd
- If Network card
- 0100
- If no network card
- 00C8
- Hdd0
Flashing BIOS
backup first
from readme: Flash Method:
- Please make a boot-able Disk which could booting into DOS environment.
- Un-zip attached files and copy it into boot-able Disk.
- Power on the system and flash the BIOS under the DOS environment.
- First, Backup the current BIOS FPT -D nodeXX-XX-bak.bin
- The instruction will be "C:/fpt -savemac -f 67J12.BIN"
- Please turn off the system and clean CMOS by Jumper.
- Turn on the system and update BIOS successful.