
| Version 46 (modified by , 11 years ago) ( diff ) |
|---|
OMF Based WiMAX Experiment
Table of Contents
- WiMAX and LTE Tutorials
- Basic WiMax Operations
- Prerequisites
- Experiment: Image and Ping Nodes Over !WiMAX Interface
- About the Base Station
- Interacting with the Base Station
- Restoring the Base Station to Defaults
- Loading a Default Image
- Manually Confirming Settings
- Connect to the WiMAX Network
- Assign an IP Address
- Repeat for Other Nodes
- Recommended Settings for IP Addresses
- Testing Connection
- Troubleshooting Connectivity Problems
- Basic WiMax Operations
Prerequisites
This tutorial series assumes you have an ORBIT account, have scheduled a session on the ORBIT test bed, are familiar with SSH'ing into the test bed itself, and are familiar with the basics of running ORBIT experiments. If you have not done these things yet, you may wish to do so before taking a look at this slightly more advanced experiment. If you are unfamiliar with or are entirely new to ORBIT, you may wish to start here.
About This Experiment
This tutorial section is adapted from the tutorials at NYU Poly WITest lab and expanded from the more concise ORBIT adaptations done previously. As before, we will perform our experiment on Sandbox 4, providing some background information at each step. For more information, see the relevant documentation for each step at one of the source websites.
The Code
The following are the links to experiment Description script and the underlying codes
At this point, we will give a primer on OMF and some of the functions inside the experiment.
Background Information
Experiments performed on ORBIT (specifically) and all GENI wireless test-beds are managed by what was once called the ORBIT Management Framework, now simply known as OMF. (For background information on frameworks, see Wikipedia.) Simply put, a framework provides programs which perform all the generic functions a programmer would otherwise need to code at a given layer to obtain functional applications. This includes programs that check various paths, run subprograms, collect data, check validity, sanitize inputs, and more. Together with its sister program, formerly known as the ORBIT Measurement Library (now known as OML), OMF is used to run experiments from start to finish.
But how is an experiment defined? At ORBIT, the aforementioned OEDL is used to mark up a script describing an experiment. Instead of having to manually define every subject and action, though, the framework (OMF) "knows" how to generically do most tasks. The experimenter simply uses OEDL functions and syntax to delineate a specific experiment. The script is then loaded onto a testbed and executed using OMF.
Dissecting the Experiment
defGroup('first_node', 'node1-4.sb4.orbit-lab.org')
defGroup is a method which creates groups of resources (usually nodes), gives them a URI for later identification (first parameter), and identifies these resources by the second parameter (in OMF version 5.3, they are identified as above). The (optional) third parameter is a block argument.
- We do not pass a block as an explicit parameter here, because it follows the method.
defGroup('first_node', 'node1-4.sb4.orbit-lab.org') do |node|
  node.net.x0.profile = '51'
  node.net.x0.ip = '10.41.14.4'
  node.net.x0.netmask = '255.255.0.0'
  node.addApplication("wimaxcu_app") do |app|
    app.measure('status_link')
  end
  ...
end
- As those familiar with Ruby will note, this method receives additional instructions from a block. Here, node is a dummy variable referring to the group itself, although the exact behavior of Ruby blocks is outside the scope (pun intended) of this discussion.
- Here, net.x0.profile configures the WiMAX network profile default as 51. The node will prefer this network when searching for available connections. This is the same as the command "wimaxcu connect network 51".
- net.x0.ip, net.x0.netmask, and net.x0.up all perform the eponymous ifconfig operations.
addApplication gives a group instructions to use the defined application in the specified manner. The principle parameter is the URI of the predefined application.
- The wimaxcu_app application tells OMF to load the application described in the wimaxcu_app.rb - in this case, the wmxstat application.
- app.measure('status_link') tells this application to use its predefined code to measure the 'status_link' property. OML will save these data for later. The exact behavior of this application is outside the scope of this discussion; suffice it to say that the implementation of the application is defined in the wimaxcu_app.rb and wmxstat programs mentioned previously.
  node.addApplication("test:app:iperf") do |app|
    app.setProperty('client', '10.41.14.6', true)
    app.setProperty('mss', 536) # Do not raise above 600
    app.setProperty('interval', 1)
    app.setProperty('bind', "10.41.14.4")
    app.measure('TCP_Info', samples => 1)
  end
This adds the iperf application functionality to the group. iperf is an application which measures connectivity by sending data packets between groups. To see a complete list of possible parameters and measurements available, examine the source code of the iperf wrapper applications.
The iperf application contains two types of functions: properties (parameters) and measurements (different data collection tools). Properties simply add various optional and required parameters to the iperf call. Measurements specify data to be collected by OML, and are the "interesting" part of the experiment.
setProperty is fairly self-explanatory. It simply configures individual parameters germane to the operation of iperf, as defined in the wrapper application.
app.measure collects the data and leverages OML to save them to an external service. A measurement type should be specified to ensure that data is collected properly.
Launch Experiment
Before launching the experiment, please download the experiment description file (wimax_ed.rb) and the application description files (iperf.rb and wimaxcu_app.rb) to the console:
wget http://www.orbit-lab.org/attachment/wiki/Tutorials/g0WmLTE/Tutorial2/iperf.rb
wget http://www.orbit-lab.org/attachment/wiki/Tutorials/g0WmLTE/Tutorial2/wimaxcu_app.rb
wget http://www.orbit-lab.org/attachment/wiki/Tutorials/g0WmLTE/Tutorial2/wimax_ed.rb
Reset the base station to default settings, and then image the nodes, as before.
omf load -i wmx-tutorial.ndz -t node1-6.sb4.orbit-lab.org,node1-4.sb4.orbit-lab.org
Optionally, double check that the image loaded correctly.
Now, turn the nodes on and launch the experiment!
omf tell -a on -t node1-4.sb4.orbit-lab.org,node1-6.sb4.orbit-lab.org
omf exec wimax_ed.rb
Troubleshooting Runtime Problems
There are a few problems which may arise during the course of attempting to run this experiment. Usually, they are the result of fragmentation of framework/operational code. Below are some errors encountered, and suggested solutions.
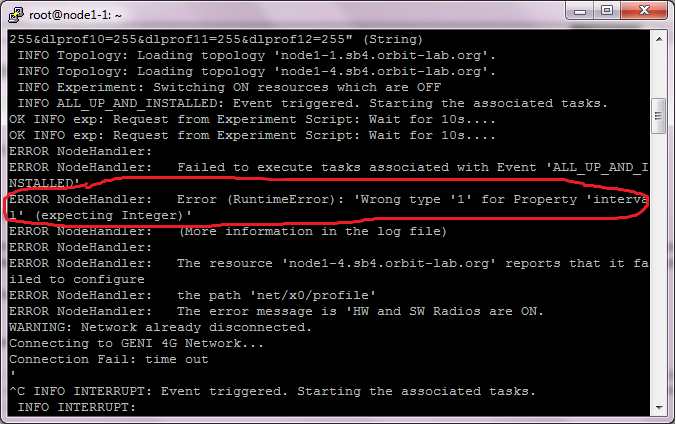
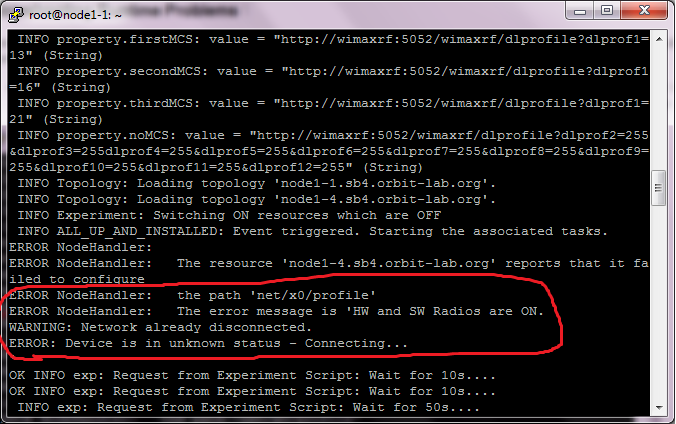
- The node handler gives an error stating the network profile failed to configure, but then the raised error describes an ongoing connection status — this is most likely a false alarm caused by running an experiment over a predefined configuration. The node reconfigures, but believes that the configuration status is an error message.

- The experiment "hiccups" and groups/nodes cannot be accessed or configured — sometimes this is nothing more than a hiccup in accessing a node. However, occasionally it means you've forgotten to turn the nodes on. The worst-case scenario is that the nodes are experiencing connectivity issues. The best way to confirm it is the latter and not the former is to return to the previous experiment and confirm whether it is possible to ping the nodes. (They need to be manually configured despite having the experiment script run partially.)
Retrieving Results
Data is collected during experimentation and pushed to a server using an experiment ID indicated during the initiation and conclusion of each experiment. This ID is important, as it is used to recover experiment results and even view them in real-time. (Server names vary with test beds. This server name is specific to ORBIT.)
To recover experiment data to the local machine, and using the experiment ID:
wget "http://oml:5054/result/dumpDatabase?expID=<your_experiment_ID>" -O myDatabase
- If the experiment ID contains non-alphanumeric ASCII characters, it is necessary to escape each of them using "%" followed by the ASCII code.
You're almost done. In order to get SQLite to recognize the database, it first must be told that the information is a database.
sqlite3 -init myDatabase myDatabase.sq3
You can also view the results in a web browser by visiting the following URL:
http://console.sb4.orbit-lab.org:5054/result/dumpDatabase?expID=<your_experiment_ID>
Final Observations
Due to the highly experimental nature of ORBIT and its OMF and OML, it is possible that this experiment may eventually be broken by future design changes. Please bear this in mind.
If this experiment does not work for you, and the above troubleshooting suggestions did not resolve your difficulties, you may need to contact an administrator. Unfortunately, it is difficult to tell the difference between the system being down and simply misconfigured for an end user. Therefore, you should attempt to debug the experiment using the above troubleshooting tips to ensure that the error is not from the configuration.
Attachments (8)
- datatypeerror.png (55.2 KB ) - added by 14 years ago.
- profileerror.png (65.6 KB ) - added by 14 years ago.
-
nyupoly_mcsmod.rb
(1.2 KB
) - added by 14 years ago.
Experiment Description
-
wmxstat
(2.3 KB
) - added by 14 years ago.
wmxstat program
-
iperf.rb
(9.1 KB
) - added by 14 years ago.
iperf app definition
-
wimaxcu_app.rb
(1.7 KB
) - added by 14 years ago.
wimaxcu_app wrapper definition
- wimax_ed.rb (1.2 KB ) - added by 14 years ago.
-
iperf2.rb
(7.5 KB
) - added by 13 years ago.
new iperf file (test)
Download all attachments as: .zip